Long Exposure Photography – Photography Tips
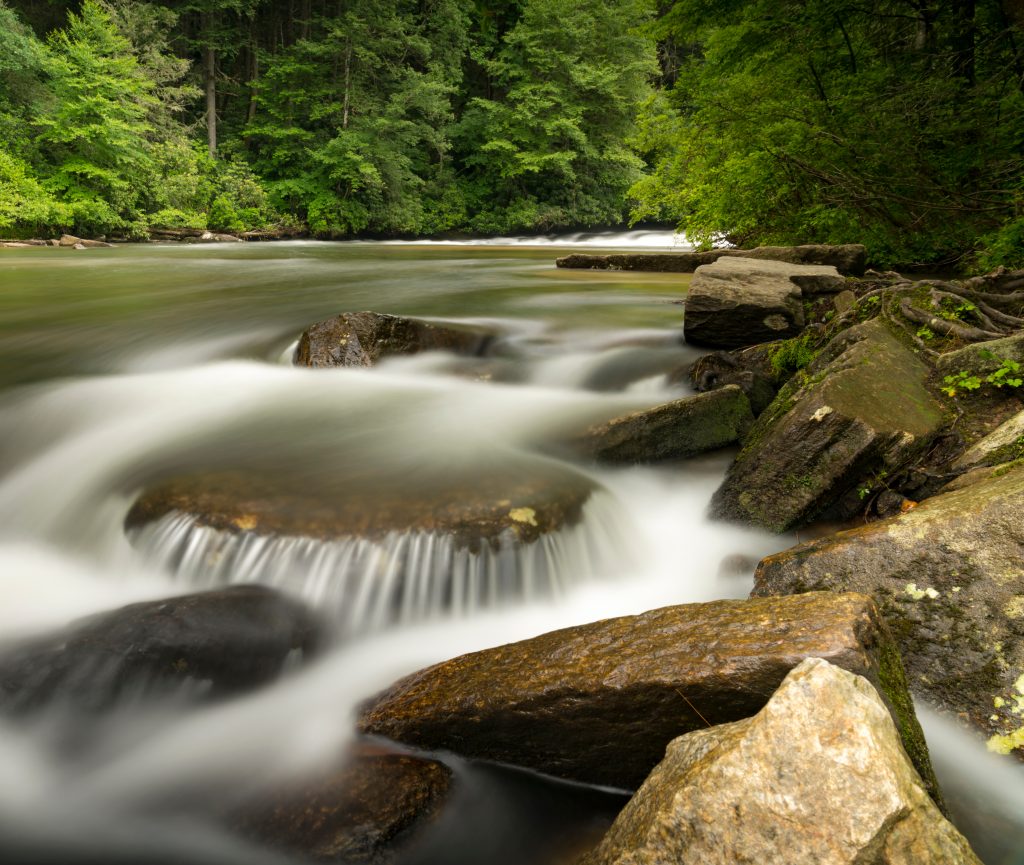
Our first image today is the one above with the water rushing over the rock! We have all seen this type of image, where the water is nice and blurry giving it movement in a still image. This is called long exposure photography, it has many applications from water all the way to stars. So let us go back to the beginning of the day to see how I planned and shot the image!
My family and I were all on vacation in North Carolina and we were sitting around the table having a bit of breakfast trying to decide what to do that day.
Learn more about me and Taylor Hulett Photography.
I had read about these magnificent waterfalls in the Dupont State Forest and knew I wanted to get out and hike! After a bit of food, sunscreen, and bug spray, I started to pack up my gear!
Long Exposure Photography TIP #1
Know what you are going to shoot and what gear you need to get the image you want!
As I am grabbing my gear, I knew I wanted to shoot water moving i.e. long exposure photography. In order to do this, you need a nice and stable camera– Tripod! I have used this one in the past and it is old reliable.
Moreover, I knew I wasn’t going at sunrise or sunset so the sun was going to be out and overhead = LOTS of light. In order for the picture to be properly exposed (long exposure photography) and not blown out (due to the sun).
I knew I needed a filter– into the bag goes my Variable Neutral Density Filter. I highly recommend this one! This is a filter that goes in front of the lens and essentially makes everything really dark. This allows the photographer to properly expose for the light of the scene (remember that sun overhead) and still have a nice long shutter speed = blurry water.
An extra battery, water, and food, camera and lens! And I was set for the adventure.
Extra Tip!
Make a list of all the gear you have and all the gear you want to use for your trip! Too many times I have been caught having forgot something!
Fast forward to the hike, we are walking along and I find the spot pictured above. Now what you might be thinking is- “This isn’t a waterfall you were talking about before!” Hey now I hear ya but this spot caught my eye. Don’t be afraid to stop and shoot something! In this digital age you have thousands and thousands of images available for you to take.
Long Exposure Photography TIP #2
Work with a subject, find all the angles and choose the most interesting one!
How do you find the most interesting angle? What do you include and exclude?? Keep reading!
Lets talk about the framing or composition of this image and how I went about finding the frame I thought was most interesting. For this particular image I wanted a foreground (something near the camera), a middle-ground (something in the middle of the frame – my subject in this case), and a background (the rest of the river, to set the scene of where I am).
Having a foreground, middleground, and background invites your viewer to look around in one of your images. This is true for all forms of photography from portraits to long exposure photography. The most general is from front to back (foreground to background) but it can be a spiral, leading lines, rule of thirds…etc.
All of these techniques are used to guide the viewer’s eye around the image. We will talk about these in the coming months and images but for this example I wanted you to be most drawn to my subject, the rock with the water spilling over it in the middleground, and then look around from there.
I included the vast river to give both a sense of scale and a sense of environment, along with the river bank to give you a line or anchor to follow through the image. Including these elements helps display a 3D world in a 2D art form.
Now I have my subject, I have my composition, and my brother’s patience is running thin, I’m ready to take my shot!
Extra Tip!
Don’t put the camera on the tripod right away! Have the ability to move around first then set up the tripod. Note! A Tripod or some sort of support for the camera is absolutely needed for long exposure photography.
I get my tripod out get my variable ND filter in front of the lens. Then dial in the exposer, shooting on manual mode I knew I wanted the lowest ISO possible with the sun out (50 ISO), I wanted to have a nice long shutter speed to get blurry water and have the whole scene in focus, so I dialed in a nice big f-stop number (not too big but somewhere around f18), and set the shutter speed to expose the image, around 8 seconds. The water was moving pretty fast so 8 seconds did the trick!
Now it’s not a big waterfall image like I was planning but I was open to new spots and being creative, I had the gear I needed to get the image, and I found an interesting composition!
Long Exposure Photography Tip #3
Even though you are on vacation and might not have time or the resources to get up for sunrise or stay out for sunset, be open to new images as you see them. Work the moment and find an interesting way to display the beautiful 3D world in a 2D art form!
Long Exposure Photography CHALLENGE!
I challenge you to find a stream, river, waterfall, lake, ocean…etc some sort of water to take a picture of, get some experience with long exposure photography! When you find a spot you like take three different angles with two pictures or each angle. One picture with a fast shutter speed and another with a slow shutter speed. In total you should have 6 images. If you would like feedback post them on my Taylor Hulett Photography Facebook Page! I will give feedback and tips!
Have a look at all of my Landscape Photography.
You may also like
How to Dress for Fall Family Photos in Golden CO
Beautiful Family Photography | Golden, Colorado
Categories
Featured Posts


